Happy Belated Birthday
Well, I think I'm enjoying the new look of my blog. It's not as pretty as before, but it will do for now! Blogger has made some really great changes and you can now easily change anything with the click of a button. Before you had to fiddle with html codes and that was a nightmare since I don't speak that language! But anyhoo, on to today's topic. I just realized that my little blog has turned 1 on July 4! Happy Birthday Blog! I hope you followers out there enjoy my blog as much as I do. I hope the next year brings some new and exciting news, projects and all around goodness. Happy hooking!


Under Construction
So apparently my background isn't going to available anymore :o( I'm not sure why. I found at The Custest Blog on the Block. They offered quite a few awesome designs, but I received a message telling me that it will no longer be available. I tried visiting the website and it was unresponsive. So hopefully my quest for a new design doesn't turn everything topsy turvy. Wish me luck...
Checking In
Hello fellow crocheters, I'm just checking in!
I noticed that my last post was in April *eeeek* Sorry!
But life is busy with two little ones and all this warm weather keeps them going like Energizer Bunnies! I'm still working on the two afghans (one giant ripple/wave, one medium round ripple) posted about earlier, they seem to be never-ending. I remember why I love small projects so much! Besides working on the afghans, my skills have been commissioned by some lovely family members and friends. The request? Dishcloths and towel toppers! Aaaah, so wonderful to finish a project in one sitting! I didn't take pics of most of them, I just finished them and they were out the door. But I am making some for myself and I will post some pics when I have a chance. I absolutely LOVE this dishcloth pattern using Tunisian crochet. I am totally new to this technique and I was 'hooked' on it right away. Sorry for the horrible pun, I couldn't resist hahaha! If you have never used this technique before, please don't be afraid to try it. It is incredibly easy and the end result is fantastic. Here is the link to the pattern, Tunisian Short Row Dishcloth. There is no picture on this website unfortunately, but if you are a Ravelry member, here is the Ravelry link, Tunisian Short Row Dishcloth.
I really hope you try it out, it is so addictive. The cloth itself when finished is very durable and great for scrubbing. The towel topper pattern I am using is a cross between a Maggie Weldon pattern, Towel Topper and a LadynThread pattern, Towel Topper 2. They work up quick and look great. I am pumping these babies out like crazy, no wonder those afghans aren't getting finished *sigh*
Till next time, happy hooking, and have a great summer everyone!
I noticed that my last post was in April *eeeek* Sorry!
But life is busy with two little ones and all this warm weather keeps them going like Energizer Bunnies! I'm still working on the two afghans (one giant ripple/wave, one medium round ripple) posted about earlier, they seem to be never-ending. I remember why I love small projects so much! Besides working on the afghans, my skills have been commissioned by some lovely family members and friends. The request? Dishcloths and towel toppers! Aaaah, so wonderful to finish a project in one sitting! I didn't take pics of most of them, I just finished them and they were out the door. But I am making some for myself and I will post some pics when I have a chance. I absolutely LOVE this dishcloth pattern using Tunisian crochet. I am totally new to this technique and I was 'hooked' on it right away. Sorry for the horrible pun, I couldn't resist hahaha! If you have never used this technique before, please don't be afraid to try it. It is incredibly easy and the end result is fantastic. Here is the link to the pattern, Tunisian Short Row Dishcloth. There is no picture on this website unfortunately, but if you are a Ravelry member, here is the Ravelry link, Tunisian Short Row Dishcloth.
I really hope you try it out, it is so addictive. The cloth itself when finished is very durable and great for scrubbing. The towel topper pattern I am using is a cross between a Maggie Weldon pattern, Towel Topper and a LadynThread pattern, Towel Topper 2. They work up quick and look great. I am pumping these babies out like crazy, no wonder those afghans aren't getting finished *sigh*
Till next time, happy hooking, and have a great summer everyone!
Shooting Star Appliqué
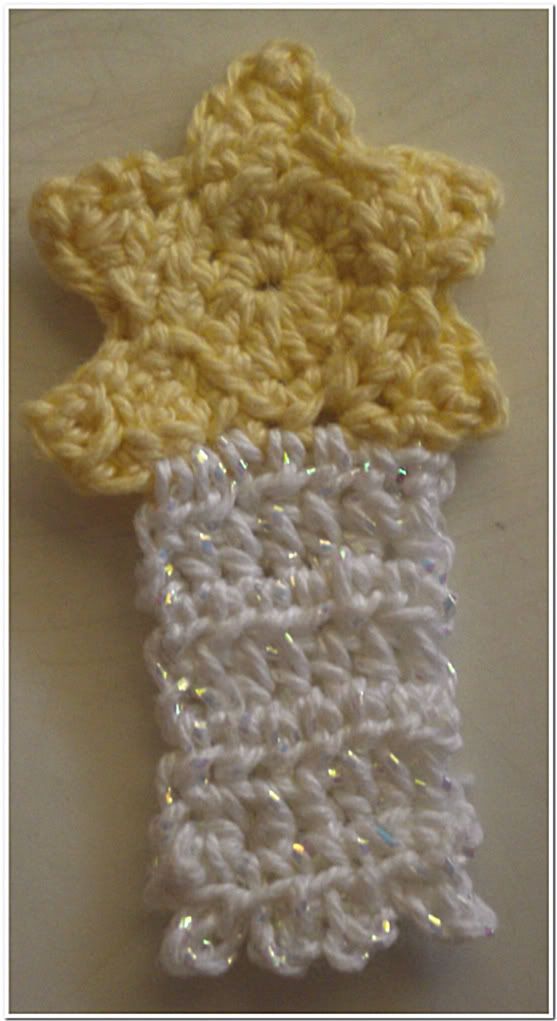
Hello again blogworld! As promised I have written out the pattern for my shooting star appliqué that goes with the Summer Wishes Shirt posted earlier. I gave this one to my daughter. She told me she's going to put it under her pillow at night and make wishes with it. She also told me that I have to make another one to put on a shirt so she can look like her doll! And without further adieu...
 This pattern is copyrighted. You can sell items made from this pattern. DO NOT sell this pattern or claim it as your own. DO NOT use my pictures without my permission. Please feel free to link to this page. Please respect the hard work it takes to figure out a pattern and please respect my generosity in sharing it with you. Thanks.
Materials
Size 10 cotton thread
yellow/glittery white - or whatever you like
Size 7 steel hook
With yellow make magic ring.
R1) 10 hdc in ring. Pull tail to close ring. Ch 1, turn
R2) ( 2 hdc in next st, hdc in next st) around. Sl st to top of beg hdc, ch 1, turn. (15 st)
R3) Hdc in next 3 st. Leave remaining st unworked. Ch 1, turn.
R4) Hdc2tog, hdc in next st. Ch 1, turn.
R5) Hdc2tog, ch1, sl st down side of triangle, back to where triangle meets the circle, sl st here. Begin next triangle in next hdc. Rep from R3 until there are 5 points on star. After sl st down the last triangle, FO.
Attach glittery white 1 st next to your previous FO towards the point of the 1st triangle.
R1) Ch 2 (counts as hdc now and throughout), hdc in next 6 spaces. Ch 2, turn. (7 hdc)
R2) Hdc across row.
R3-7) Rep previous row. At end of row 7, ch 1, turn.
R8) *Sc in next st, ch 3, sl st through top of last sc made*. Picot made. Continue this across the row, ending with sc. 4 picots made. FO.
If you have any problems or questions, please feel free to email me or leave a comment. Happy Hooking!
Shooting Star Appliqué
By Connie Stieler
Materials
Size 10 cotton thread
yellow/glittery white - or whatever you like
Size 7 steel hook
With yellow make magic ring.
R1) 10 hdc in ring. Pull tail to close ring. Ch 1, turn
R2) ( 2 hdc in next st, hdc in next st) around. Sl st to top of beg hdc, ch 1, turn. (15 st)
R3) Hdc in next 3 st. Leave remaining st unworked. Ch 1, turn.
R4) Hdc2tog, hdc in next st. Ch 1, turn.
R5) Hdc2tog, ch1, sl st down side of triangle, back to where triangle meets the circle, sl st here. Begin next triangle in next hdc. Rep from R3 until there are 5 points on star. After sl st down the last triangle, FO.
Attach glittery white 1 st next to your previous FO towards the point of the 1st triangle.
R1) Ch 2 (counts as hdc now and throughout), hdc in next 6 spaces. Ch 2, turn. (7 hdc)
R2) Hdc across row.
R3-7) Rep previous row. At end of row 7, ch 1, turn.
R8) *Sc in next st, ch 3, sl st through top of last sc made*. Picot made. Continue this across the row, ending with sc. 4 picots made. FO.
If you have any problems or questions, please feel free to email me or leave a comment. Happy Hooking!
Summer Wishes Shirt
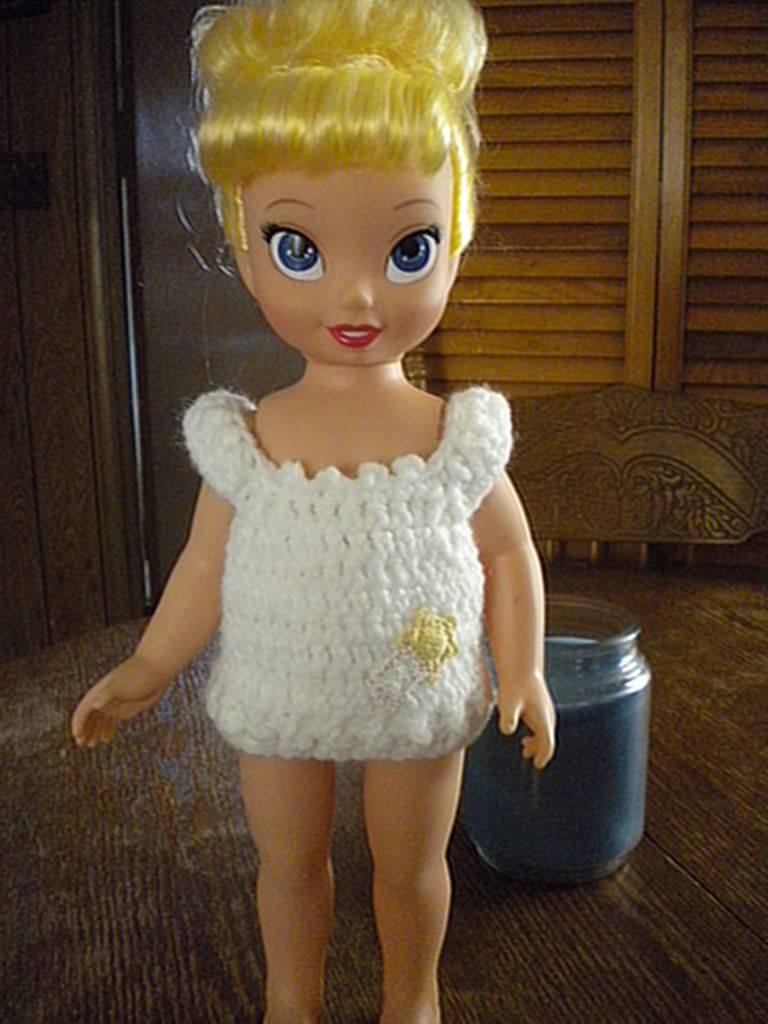
Hello all! Lately I've been super busy working on two different afghans, one for my wonderful cousin and the other a kit from Mary Maxim for my grandmother. They're both coming along great, but giant projects bore the crap out of me! I found some spare time to whip up this shirt for my daughter's Disney Princess Dolls. She has Belle and Tinkerbell, both given to her as gifts. She just turned 3 and dressing up her dolls is one of her new favourite things to do. Unfortunately, these dolls don't come with extra outfits. She just gets them both naked and switches their clothes for hours. I started feeling sorry for her lol. So far I just have this shirt done, but I hope to make a matching skirt or something to complete the outfit, and she has already requested a sweater and dresses and purses, what have I gotten myself into??
This pattern is copyrighted. You can sell items made from this pattern. DO NOT sell this pattern or claim it as your own. DO NOT use my pictures without my permission. Please feel free to link to this page. Please respect the hard work it takes to figure out a pattern and please respect my generosity in sharing it with you. Thanks.

Materials
Worsted Weight Yarn ( I used Red Heart Super Saver)
Hooks sized E, F
small button
yarn needle
Special Stitches
Extended Single Crochet ( ESC )
Insert hook in to stitch indicated, YO pull through. YO pull through 1 loop, YO pull through remaining loops on hook.
**Please note that this pattern has only been used by myself. If you notice an error, please email or leave a comment so I may fix it, thanks!**
(Ch 2 counts as 1st st)
Using smaller hook, ch 40 * leave a good tail length for sewing back seam *
R1) Dc in 2nd ch from hook, and in each across (38 dc)
R2) Ch 2, turn. FPDC around 1st dc. BPDC around next dc. Continue this pattern until the end of the row.
Switch to larger hook.
R3) Ch 2, turn. ESC across row.
*rep last row until piece measures 2 1/2 ", not including the ribbing* For me, this took 6 rows total.
Ch 2, turn. ESC in next 5 st. Ch 16, skip 5 st, ESC in next st. Hdc2tog twice. ESC in next 8 st. Hdc2tog twice. ESC in next 16 st. Skip next 5 st. ESC in last 5 st.
Ch 2, turn. ESC in next 4 st. ESC entire ch, Hdc2tog twice. ESC in next 6 st. (This side is slightly longer for button placement)
Ch 2, turn. ESC in next 4 st. Hdc2tog 3 times. ESC in next 5 st. Hdc2tog 3 times. * Sc in next 2 st, ch 2 sl st through top of last sc * repeat 3 times more. End with 2 sc. Hdc2tog 3 times. ESC in next 5 st. Hdc2tog 3 times. Hdc2tog 3 times. ESC in next 4 st. Fasten off.
Seam the back of shirt, starting at the bottom working upwards. 7 rows should be seamed together.
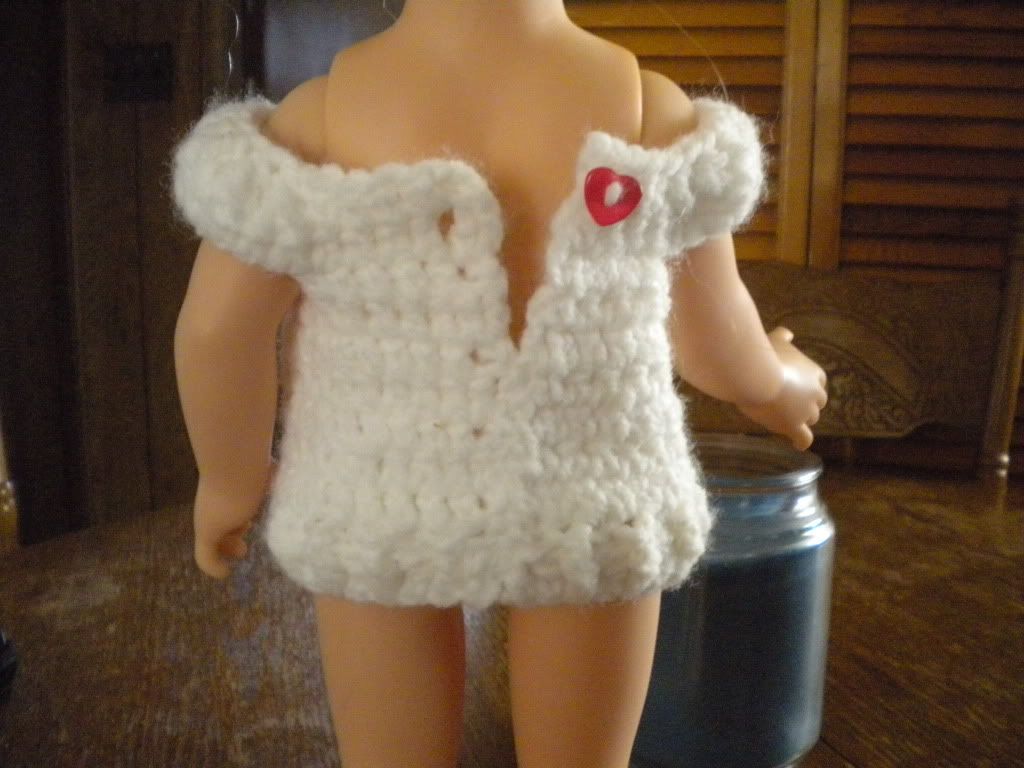
Attach small button to the last row.

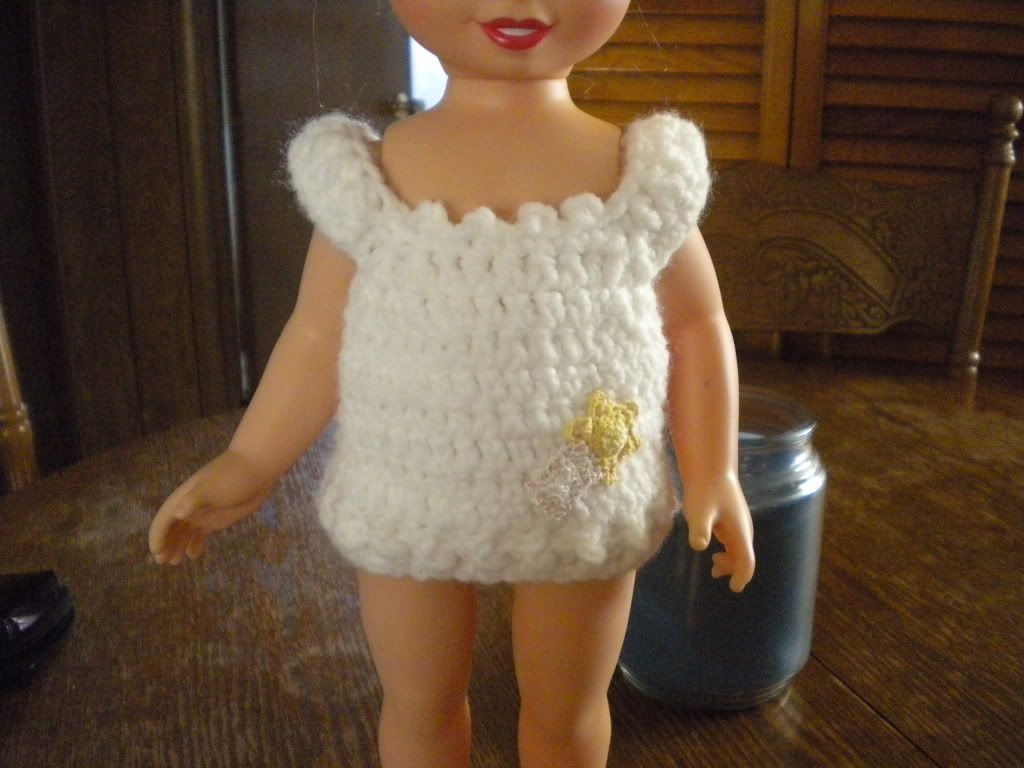
I made a shooting star applique for the front of the shirt. I will post a pattern for that and a better pic as soon as I can!
 I made the sleeves loose so they can worn off the shoulder if desired. If you want a tighter sleeve, just adjust the length of chain made. Happy hooking!
This pattern is copyrighted. You can sell items made from this pattern. DO NOT sell this pattern or claim it as your own. DO NOT use my pictures without my permission. Please feel free to link to this page. Please respect the hard work it takes to figure out a pattern and please respect my generosity in sharing it with you. Thanks.
Summer Wishes Shirt
by Connie Stieler
Fits 15" doll
Materials
Worsted Weight Yarn ( I used Red Heart Super Saver)
Hooks sized E, F
small button
yarn needle
Special Stitches
Extended Single Crochet ( ESC )
Insert hook in to stitch indicated, YO pull through. YO pull through 1 loop, YO pull through remaining loops on hook.
**Please note that this pattern has only been used by myself. If you notice an error, please email or leave a comment so I may fix it, thanks!**
(Ch 2 counts as 1st st)
Using smaller hook, ch 40 * leave a good tail length for sewing back seam *
R1) Dc in 2nd ch from hook, and in each across (38 dc)
R2) Ch 2, turn. FPDC around 1st dc. BPDC around next dc. Continue this pattern until the end of the row.
Switch to larger hook.
R3) Ch 2, turn. ESC across row.
*rep last row until piece measures 2 1/2 ", not including the ribbing* For me, this took 6 rows total.
Ch 2, turn. ESC in next 5 st. Ch 16, skip 5 st, ESC in next st. Hdc2tog twice. ESC in next 8 st. Hdc2tog twice. ESC in next 16 st. Skip next 5 st. ESC in last 5 st.
Ch 2, turn. ESC in next 4 st. ESC entire ch, Hdc2tog twice. ESC in next 6 st. (This side is slightly longer for button placement)
Ch 2, turn. ESC in next 4 st. Hdc2tog 3 times. ESC in next 5 st. Hdc2tog 3 times. * Sc in next 2 st, ch 2 sl st through top of last sc * repeat 3 times more. End with 2 sc. Hdc2tog 3 times. ESC in next 5 st. Hdc2tog 3 times. Hdc2tog 3 times. ESC in next 4 st. Fasten off.
Seam the back of shirt, starting at the bottom working upwards. 7 rows should be seamed together.
Attach small button to the last row.
I made a shooting star applique for the front of the shirt. I will post a pattern for that and a better pic as soon as I can!
Subscribe to:
Posts (Atom)